Fridge Organization Hacks That Look Pinterest-perfect You’ll Want to Copy
Posted in :
You know that oddly satisfying feeling when you open a fridge and everything looks like a tiny, chilled boutique? Labels lined up, produce sparkling, leftovers not accusing you from the back row? Let’s make that your reality—without turning you into a full-time fridge stylist.
These fridge organization hacks that look Pinterest-perfect aren’t just pretty; they actually work. We’re talking fewer mystery containers, less food waste, and a fridge that makes you feel like you have your life together (or at least your condiments).
1. Color-Code Like a Stylist, Not a Scientist
First impressions matter. When you open your fridge, you want instant clarity—not a scavenger hunt. Color-coding makes your shelves look magazine-level neat and helps you find things faster.
How to Pull It Off
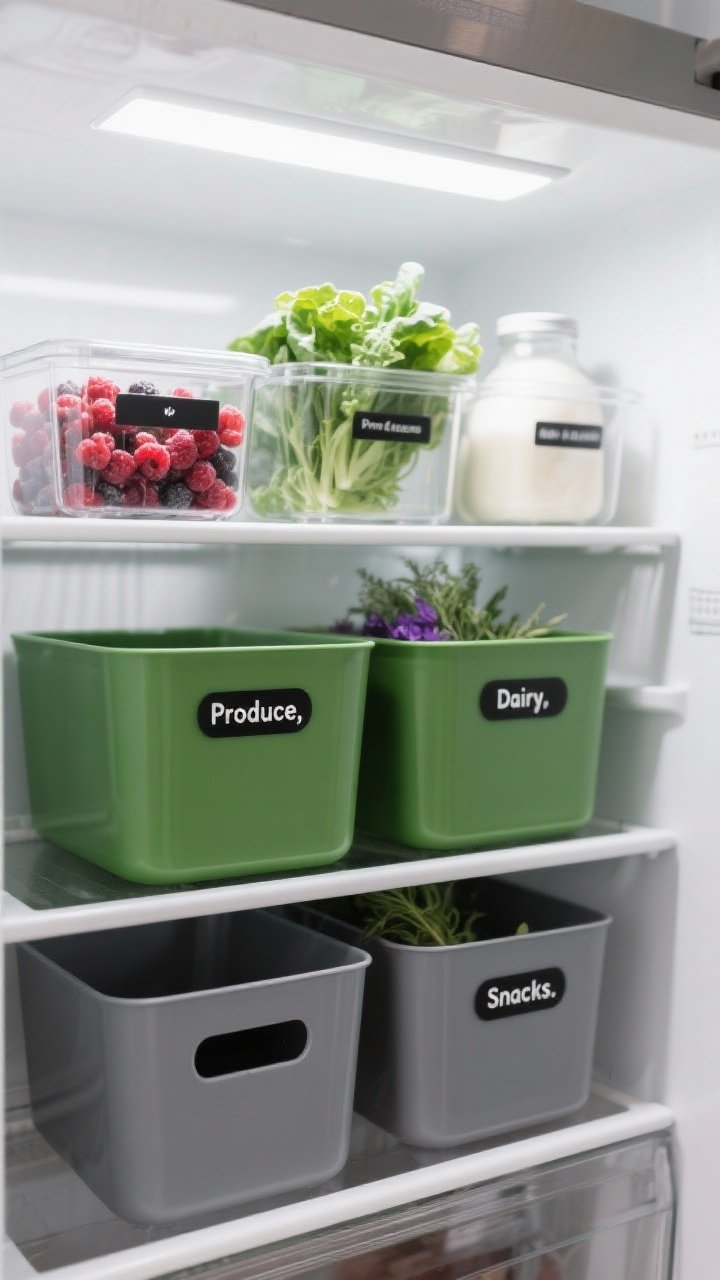
- Designate colors by category: Green bins for produce, clear for dairy, smoky gray for snacks. It’s subtle but super effective.
- Use matching labels: Stick with one font and style. Black-and-white labels are classic and clean, FYI.
- Decant smartly: Transfer berries, greens, and herbs into clear containers so the colors pop and you can see what’s inside.
Bonus: Color-coded bins discourage random-snack chaos because everyone knows where things live. A tiny system = big peace of mind.
2. Decant & Label: The Shelfie Glow-Up
Want that “Pinterest-perfect” vibe instantly? Decanting is your shortcut. Pour juices, cold brew, and sauces into sleek bottles. Move yogurts, shredded cheese, and snacks into clear containers. Your shelves suddenly look curated, not crammed.
Keep It Practical
- Pick a container style and commit: A mix of shapes is fine, but keep one material (glass or BPA-free plastic) for cohesion.
- Invest in labels: Use waterproof ones. Add date opened or use by to fight off the dreaded science experiment.
- Use uniform heights: Line up taller bottles in the back, shorter in front for that “store display” look.
IMO, decanting is 50% aesthetics, 50% food waste prevention. If you can see it, you’ll use it.
3. Zones = Sanity (And Fewer Oops Moments)
Your fridge needs zones like your closet needs sections. Not everything can be tossed on any shelf and called a day. Create dedicated areas so every item has a home—and a purpose.
Smart Zone Ideas
- Meal Prep Hub: Use a wide bin for prepped veggies, cooked grains, and proteins. One grab-and-go spot = faster dinners.
- Breakfast Bar: Yogurts, berries, chia pudding, and nut butters all nestled together. Mornings? Easier.
- Snack Station: Eye-level for kids and late-night grazers. Portion snacks into small containers—so easy, so tidy.
- Leftover Lane: One bin labeled with a bold “Eat Me First.” Saves money and minimizes gloom-inducing discoveries.
- Protein Zone: Raw meats on the bottom shelf (colder, safer) in a leak-proof tray.
Tip: Keep zones consistent. If your brain always knows where hummus goes, it’ll get put away correctly every time—by everyone, ideally.
4. Shelf Strategy: Work With Your Fridge’s Microclimates
Yes, your fridge has microclimates. No, that’s not extra—the temp varies by shelf. When you play to those strengths, food lasts longer and looks better.
What Goes Where
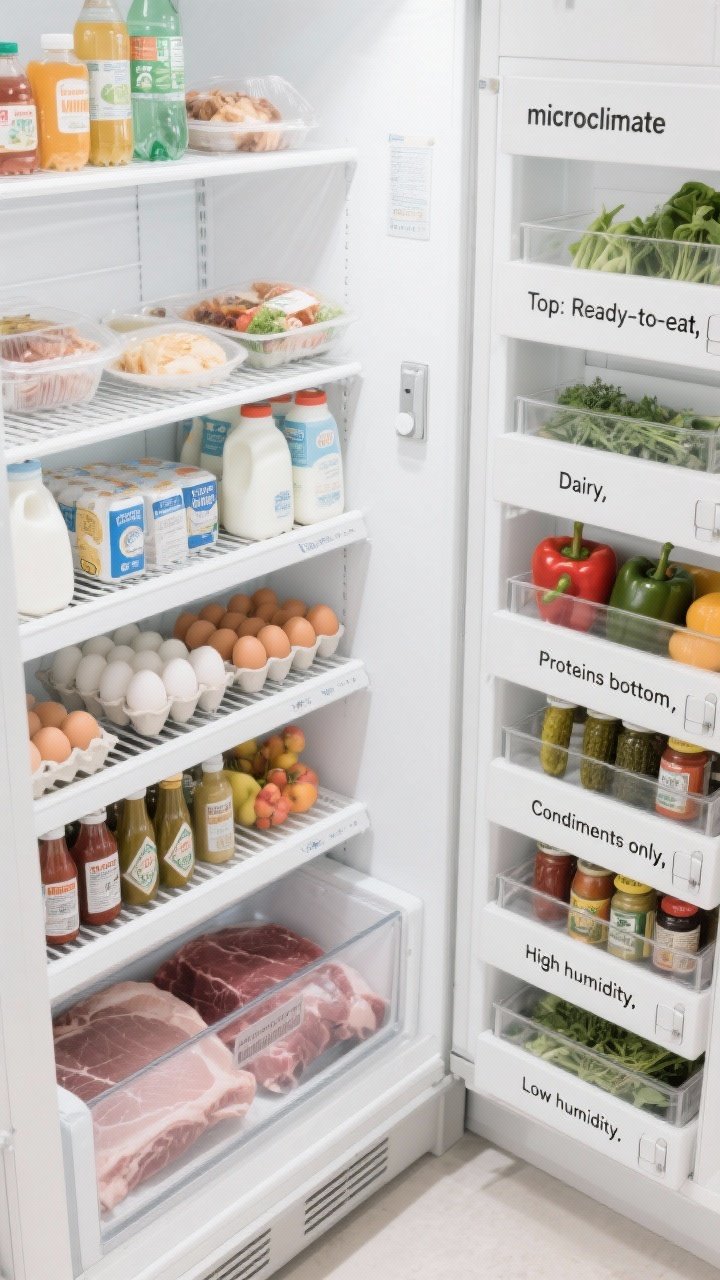
- Top shelf: Drinks, leftovers, ready-to-eat items. Temps are consistent here, perfect for daily grab-and-go.
- Middle shelves: Dairy and eggs. Stable temps keep them fresher longer.
- Bottom shelf: Raw meat or fish in a bin. It’s the coldest section and prevents drips from going rogue.
- Doors: Condiments and pickles only. It’s the warmest spot—milk here is a rookie mistake.
- Crisper drawers: Separate one for high-humidity (leafy greens, herbs) and one for low-humidity (fruits, peppers). Use those humidity sliders—they actually do something.
Make mini signs inside for who lives where. It’s slightly extra, and also life-changing.
5. Bins, Turntables, and Risers: The Holy Trinity
Container nerds, assemble. The right tools make everything look intentional and keep you from knocking over a jar avalanche. Choose clear, stackable pieces so you can see your food and access it without a tetris session.
Must-Haves That Pull Their Weight
- Clear bins with handles: Slide out sauces, snacks, or meal kits like drawers.
- Lazy Susans (turntables): Perfect for short jars and condiments—no more forgotten miso behind the mayo.
- Risers: Add a tier for shorter items so every inch counts. Just don’t block the internal airflow vents.
- Can dispensers: Keep sparkling water or seltzers tidy and photo-friendly.
- Egg organizers: Optional but pretty. Choose one with a lid so you can stack without squishing.
And yes, measure your shelves first. Nothing kills a vibe like a bin that doesn’t fit by half an inch. Been there.
6. Produce That Stays Pretty: Wash, Prep, and Store Like a Pro
Nothing ruins the aesthetic faster than wilted greens. The trick is prepping produce for longevity and display. You’ll snack more and toss less.
Prep Routine
- Wash and dry thoroughly: Excess moisture = sad lettuce. Use a spinner or dry with towels.
- Line containers: Add a paper towel or reusable cloth at the bottom to absorb moisture.
- Vent when needed: Berries and herbs do best with airflow; use vented containers or leave a tiny corner open.
- Cut smart: Pre-slice bell peppers, carrots, and melon. Keep delicate fruits whole until you’re ready to eat.
- Herb bouquet: Store herbs upright in a jar with a bit of water, loosely covered. Looks chic, works brilliantly.
For extra polish, put produce in matching clear bins by type—greens together, crunchy veg together, fruits together. It’s a color story, but edible.
7. Maintenance That Actually Sticks (And Still Looks Cute)
Real talk: the prettiest fridge falls apart without a plan. A little routine keeps things Pinterest-level with minimal effort. Think maintenance, not overhaul.
Simple Habits
- Weekly five-minute reset: Toss expired stuff, wipe spills, shift leftovers to the front. Do it before grocery day.
- Label by date: Use small, removable labels to mark opened and use by dates. Future you will be very grateful.
- Decant on autopilot: When you unload groceries, move items into their containers immediately. It takes minutes and preserves the look.
- Keep a “Use First” bin: Anything that needs to go this week lives here. Saves $$ and guilt.
- Set a vibe: Add a small baking soda deodorizer in a cute jar and a mini fridge mat or liner. Functional and surprisingly stylish, FYI.
If you share your fridge, give everyone a mini bin. Personal zones reduce roommate/partner chaos—and snack theft, allegedly.
Final Note: Start with one shelf if the whole thing feels intimidating. Then build your system week by week. Before you know it, you’ll open your fridge just to admire it—no judgment. Snap that shelfie and bask in your fridge organization hacks that look Pinterest-perfect victory. You earned it.