Terracotta pots are the plain white T-shirts of the plant world—classic, but begging for a glow-up. Good news: a quick makeover can turn those basic clay babes into custom decor you’ll flex on your shelf. Ready to paint, texture, and seal like a pro? Let’s make some magic—no art degree required.
1. Gather Your Supplies Like a Craft Ninja
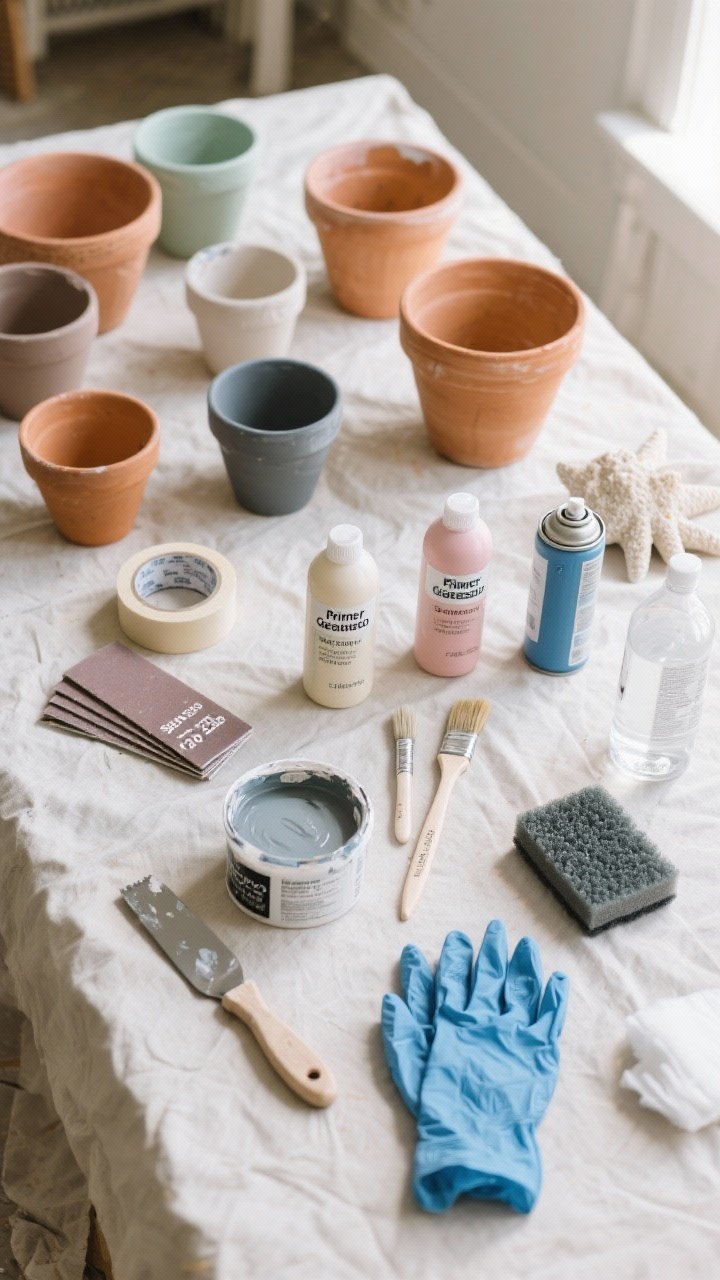
Before we start, let’s get the right tools so you’re not running to the garage mid-project with painty fingers. Keep it simple, but smart.
What You’ll Need
- Terracotta pots (clean and dry)
- Acrylic paint or chalk paint (matte finishes look luxe)
- Primer or gesso (optional but helpful)
- Paintbrushes (1 small detail, 1 medium flat)
- Painter’s tape (for crisp lines and patterns)
- Spackle or joint compound (for textured looks)
- Sandpaper (120–220 grit)
- Sea sponge or foam sponge
- Matte sealer (clear acrylic spray or brush-on)
- Drop cloth, gloves, and rubbing alcohol (for prep)
Pro tip: Terracotta is porous. If you’re planting directly in the pot, choose a breathable sealer on the outside only so the clay can still release moisture. If you plan to pop a nursery pot inside, go wild with the finish.
2. Prep Like You Mean It (It Matters, Promise)
Yes, prep is the least sexy part, but it’s the difference between “Wow!” and “Why is this peeling?” Give your pots a mini spa day.
Quick Prep Steps
- Clean: Wipe off dust with a damp cloth. If there’s mineral residue, scrub lightly with vinegar and water, then dry completely.
- De-grease: Swab with rubbing alcohol. Paint sticks better to clean surfaces—science!
- Prime (optional): A coat of gesso or multipurpose primer helps prevent blotchy absorption and gives you smoother coverage.
- Tape: If you’re doing color blocking or stripes, tape off your lines now. Burnish the edges with a fingernail for crisp results.
FYI: Terracotta can “drink” your paint. If your first coat looks patchy, that’s normal. Keep going.
3. Paint Techniques That Look Designer
Here’s where it gets fun. Whether you’re into muted earthy vibes or bold color, these techniques are easy and high-impact.
Color Block Chic
- Paint the top rim one color and the base another for a minimalist, modern vibe.
- Use painter’s tape to create angled bands or vertical stripes. Remove while the paint is still slightly wet for clean lines.
Hand-Painted Patterns
- Go graphic: Dots, dashes, arches, and checkerboard patterns. Imperfect is perfect.
- Neutral on neutral: Beige pot + white pattern = subtle and chic.
Stoneware Dupe
- Paint a base layer in warm beige or greige.
- Use a dry brush to add feathery streaks of a darker tone.
- Tap lightly with a speckling brush or toothbrush for teensy freckled dots. Instant pottery vibes.
Color tip: Think of your room’s palette. Soft sage, taupe, and charcoal feel elevated; terracotta + cobalt reads Mediterranean; blush and cream = cozy, airy, and Instagram-friendly.
4. Texture Tricks For That Artisan Look
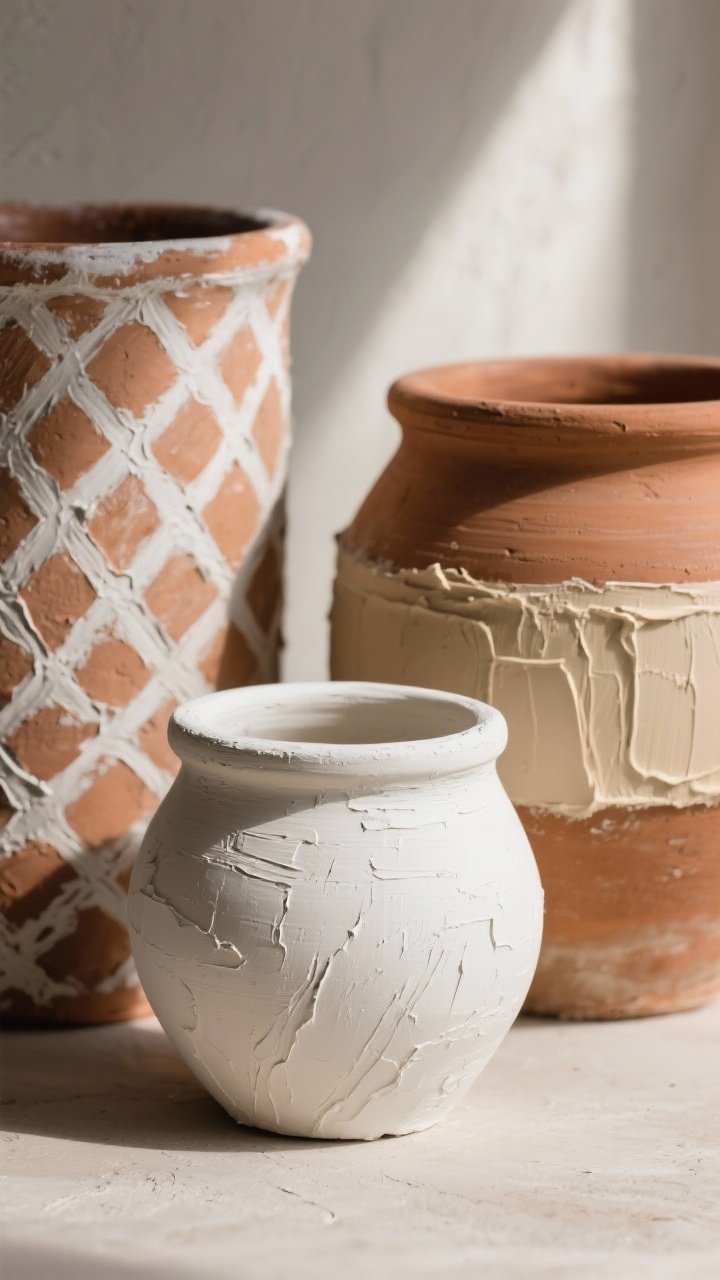
Texture is the secret sauce. It hides imperfections and screams “custom.” You’ll fool people into thinking you splurged at a boutique.
Plaster/Spackle Finish
- Spread thin spackle or joint compound with a putty knife in random, organic strokes.
- Let it dry fully, then lightly sand edges for a soft, lived-in finish.
- Paint over with chalk paint, then seal. Creamy whites and oat tones look high-end.
Baking Soda Paint
- Mix 1 part baking soda to 3 parts acrylic paint for a gritty, ceramic-like texture.
- Apply with a soft brush in short, crisscross strokes to mimic pottery.
Textured Bands
- Tape off a thick band and apply spackle just to that section for a raised detail.
- Paint the band a contrasting color for a subtle 3D moment.
IMO: If you only try one thing, make it the plaster finish. It’s forgiving, neutral, and looks fancy without trying.
5. Aging, Distressing, And Faux Finishes
Love that weathered, collected-over-time look? You can fake it in under an hour. No need to wait for actual decades.
Limewash Effect
- Mix 1 part paint with 1–2 parts water to make a sheer wash.
- Brush on, then blot with a damp sponge to soften. Layer different tones for depth.
Antique Clay Patina
- Base coat: warm terracotta or sandstone.
- Glaze: mix brown/gray acrylic with a little water and a drop of matte medium.
- Brush into crevices, then wipe off the excess with a soft cloth. This leaves “age” in the low spots.
Salt Speckle or Mineral Stain
- Dip an old toothbrush in watered-down dark paint and flick tiny specks across the surface.
- Keep it light—like freckles, not chicken pox.
Distress with intent: Sand lightly on rims and edges where natural wear would happen. Less is more.
6. Seal It Right (So Your Hard Work Lasts)
A good seal keeps your finish pretty and stops water rings from being a buzzkill. The right sealer depends on whether the pot will live indoors, outdoors, or both.
Sealing Basics
- Indoors: Use a matte acrylic spray or brush-on sealer on the exterior only for a natural look.
- Outdoors: Choose a UV-resistant, water-resistant sealer. Two light coats beat one heavy coat.
- Drainage: Never seal over the drainage hole. Let the pot breathe.
Shine scale: Matte = modern, Satin = soft glow, Gloss = ceramic-like. Match the sheen to your style. FYI, matte hides imperfections best.
7. Style Your New Pots Like A Designer
Now the fun part: showing them off. The right pairing of plant + pot + placement turns your space into a mini sanctuary.
Plant Pairings That Pop
- Textured pots + soft, trailing plants (string of pearls, pothos) = dreamy contrast.
- Graphic patterns + architectural plants (snake plant, ZZ plant) for bold balance.
- Earthy limewash + muted greens (sage, eucalyptus) for spa vibes.
Display Ideas
- Cluster in threes: Mix heights and widths for a curated vignette.
- Shelfie moment: Add a stack of books, a candle, and one quirky object. Done.
- Entryway welcome: Tall pot by the door, mini pot on a console—instant polish.
Mini maintenance: If you see water marks over time, a quick wipe and a fresh mist of sealer brings them back to life. Also, slip a plastic nursery pot inside to prevent soil staining—your future self will thank you.
You did it! From plain clay to custom decor, your pots now look boutique-level without the boutique price. Snap a pic, tag your inspo board, and keep experimenting—because once you makeover one terracotta pot, you’ll want to transform them all. Happy crafting!