Your entryway is doing the most—catching shoes, bags, keys, and that random mail you swear you’ll sort “later.” Let’s give it some stylish support. A DIY entryway storage bench for small spaces is the unicorn: compact, hardworking, and cute enough to make you look organized on purpose.
Grab a coffee and let’s build something that looks custom, hides the chaos, and gives you a place to tie your shoes like a civilized human.
1. Measure Once, Style Twice: Plan The Perfect Fit
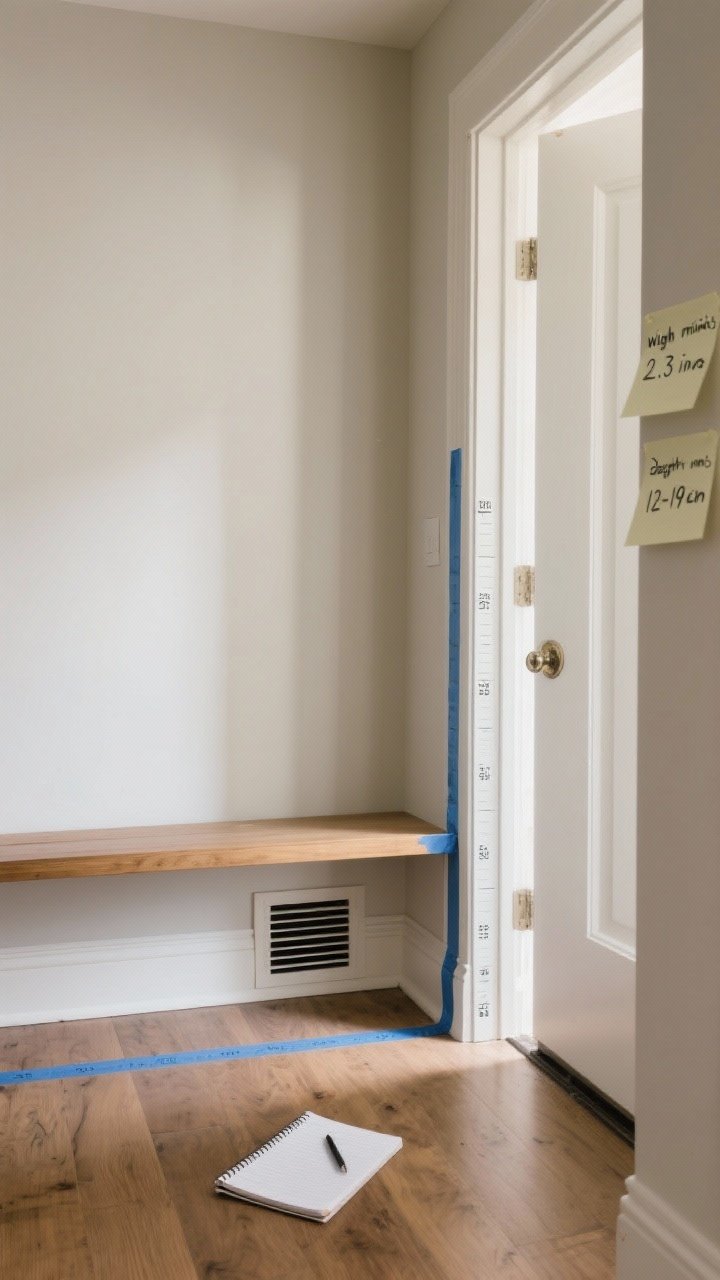
Small space? No problem. Start with a tape measure and a tiny dose of reality. You want a bench that fits like it was born there—not blocking doors, not awkwardly floating.
Smart Measuring Tips
- Width: Measure wall-to-wall space and subtract 2–3 inches for breathing room.
- Depth: 12–16 inches is ideal for narrow entryways. Any deeper and your hallway will feel cramped.
- Height: 17–19 inches feels comfy for sitting and putting on shoes.
Take photos and note outlets, baseboards, and vents. FYI, baseboards can eat precious inches—either work around them or notch the bench legs later.
2. Choose Your Style: Minimal, Cottage, Or Mudroom Vibes
Function comes first, but looks keep you loyal. Pick a style that plays nicely with the rest of your home so the bench feels intentional, not like a random garage project.
Design Directions
- Minimal & Sleek: Clean lines, slab sides, matte paint, and hidden bins. Think Scandinavian but on a budget.
- Cottage & Cozy: Shiplap sides, beadboard back, soft cushions, and woven baskets.
- Mudroom Lite: Add a simple back panel with hooks and a top shelf. Instant drop zone.
Pro move: Match or complement your door trim color. It tricks the eye into thinking your bench is built-in. Sneaky and chic.
3. Materials & Tools: Keep It Simple, Keep It Strong
No table saw? No problem. Most hardware stores will cut boards for you. Choose durable, budget-friendly materials that can handle wet umbrellas and gritty sneakers.
What You’ll Need
- Wood: 3/4-inch plywood for the box (sanded birch looks high-end), 1×2 or 1×3 poplar for trim. Optional 2x2s for internal supports.
- Fasteners: 1 1/4-inch pocket-hole screws or wood screws, wood glue, brad nails (optional).
- Storage: Baskets, bins, or a hinged lid if you’re going for a flip-top bench.
- Finishes: Primer, paint or stain, topcoat (polycrylic for water-based finishes).
- Tools: Drill/driver, pocket-hole jig (optional), clamps, sander, measuring tape, level, stud finder.
IMO, pocket holes give you clean joints fast. If that’s not your vibe, go classic with countersunk screws and wood filler.
4. Build The Box: Stable, Space-Savvy, And Surprisingly Easy
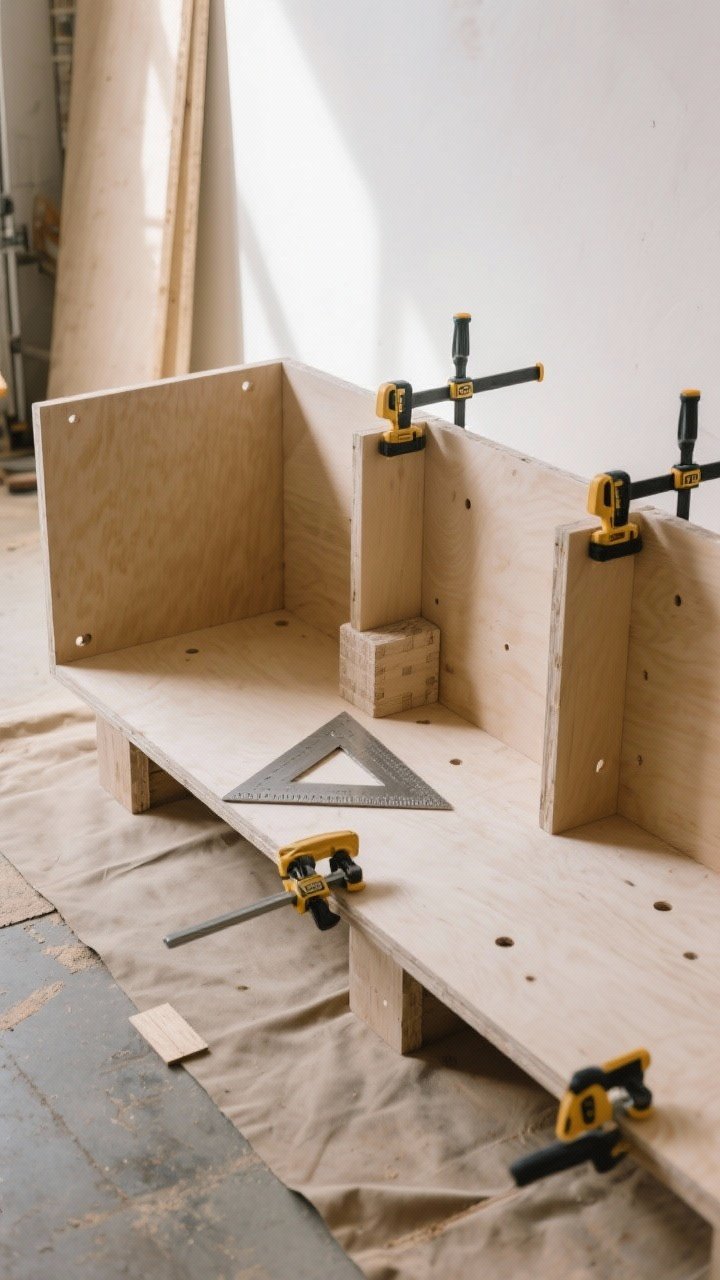
This is just a sturdy rectangle with a divider or two. Keep it simple and strong so it can carry weight without wobbling.
Basic Cut List (Adjust To Fit)
- (2) Side panels: Bench depth x desired height
- (2) Top and bottom panels: Bench width x depth
- (1–2) Dividers: Height minus top/bottom thickness x depth
- (Optional) Back panel: 1/4-inch plywood, full width x full height
Assembly Steps
- Dry fit first. Lay everything out and check square corners with a carpenter’s square.
- Build the frame: Attach sides to the bottom panel with glue and screws or pocket holes.
- Add dividers: Space them to fit baskets or shoe totes. Use a spacer block so everything aligns.
- Attach the top: Screw from underneath if possible for a clean look. Add 2×2 corner blocks inside for extra strength.
- Back panel: Nail or screw it on to keep the whole thing square. It’s optional but helpful.
Make sure the bench sits level. Shim it now if your floors aren’t perfect—because they never are.
5. Storage That Works: Baskets, Cubbies, Or A Hidden Lid
Form meets secret stash. Think about what actually lands in your entry: shoes, backpacks, dog leashes, the rogue beanie collection.
Smart Storage Configs
- Cubbies + Baskets: Easiest route. Measure your baskets first, then build to fit. Label them if your household “forgets” where things go.
- Flip-Top Bench: Hinges + lid for deep storage. Great for seasonal gear. Add a soft-close hinge so fingers survive.
- Shoe Shelves: Add a mid-shelf in each cubby. Angle the shelf slightly if you want a shoe boutique vibe.
- Hidden Drawer: A shallow top drawer for keys and mail if you add a back panel with a slim box. Bonus: less clutter on top.
Don’t overcomplicate it. The best system is the one you’ll actually use at 6 a.m. when you’re running late.
6. Make It Pretty: Trim, Paint, And A Cushy Top
This is where it goes from DIY to “Did you buy that?” A little trim and a crisp finish make everything look custom.
Finish Like A Pro
- Sand everything smooth: 120 grit, then 220. Round off edges so it’s comfy on the backs of knees.
- Fill and caulk: Wood fill screw holes, caulk seams for a built-in look.
- Prime, then paint: Satin or semi-gloss stands up to traffic. Classic colors: warm white, greige, deep navy, charcoal.
- Topcoat for durability: Especially if you went with stain. Polycrylic won’t yellow light colors.
DIY Cushion (Optional but Luxe)
- Cut 2–3-inch foam to size, wrap with batting, then staple fabric to a thin plywood underlayment.
- Choose performance fabric or outdoor fabric that laughs at mud and melted snow.
- Add non-slip pads or Velcro to keep the cushion from migrating.
Hardware moment: If you added a back panel, install a simple row of hooks and a narrow floating shelf above the bench. Instant mudroom, zero renovation.
7. Style It Small-Space Smart: Light, Layers, And Zero Clutter
Now the fun part. Style it so your entry feels bigger, brighter, and ridiculously organized. Yes, you can fake that.
Visual Tricks That Work
- Mirror above the bench: Bounces light and makes the space feel larger. Round mirrors soften boxy benches.
- Vertical lines: Add beadboard or vertical shiplap to draw the eye up—cozy without crowding.
- Lighting: A small sconce or slim table lamp (on a nearby console) warms up the zone.
Function-First Styling
- One tray, one bowl: Keys and sunglasses get a home. That’s it. No trinket chaos.
- Shoe rules: Two pairs per person max in the entry. Overflow lives in a closet—boundaries, people.
- Seasonal swap: Rotate baskets—winter hats out, summer sunscreen in. Five-minute reset, huge payoff.
FYI, a small rug runner under the bench helps define the zone. Pick something low-pile and washable because life happens.
Quick Recap Checklist
- Measure to fit—depth is everything in a tight hallway.
- Build a strong box with dividers sized for your baskets.
- Finish clean: sand, fill, prime, paint, protect.
- Layer in hooks, mirror, and a cushion for polish.
That’s it—you just designed your first small-space entryway that actually works. Your future self (and your shoes) say thanks. Now go enjoy that “wow, you’re so organized” compliment you absolutely deserve.