Let’s be real: a cute wreath on your front door is the fastest way to say “I’ve got my life together,” even if your laundry says otherwise. The best part? You don’t need fancy supplies or a crafting degree to pull it off. These DIY wreaths for every season are easy, budget-friendly, and ridiculously pretty.
1. Spring Awakening: Fresh Florals Without The Fuss
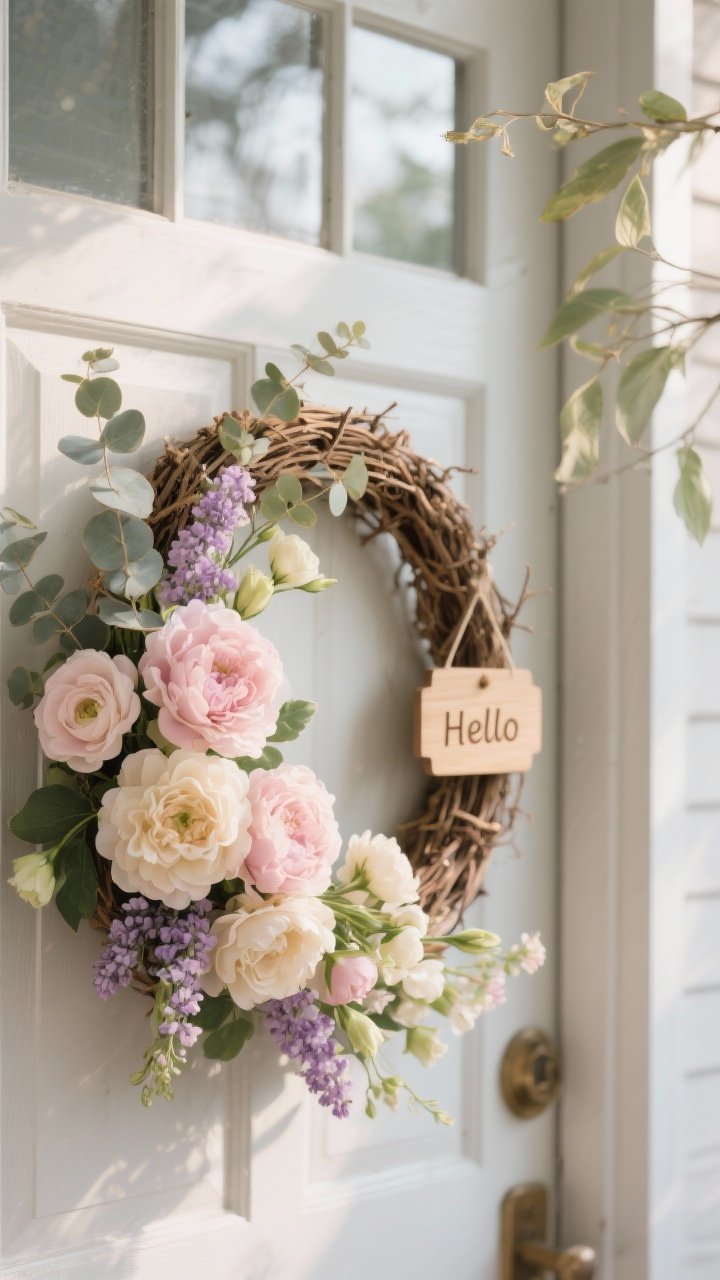
Spring wreaths are all about color and softness. Think peonies, ranunculus, and lilacs—faux or real. You’ll get that “just bloomed” vibe instantly.
How-To Vibes
- Start with a grapevine wreath base (it’s forgiving and easy to work with).
- Choose a color palette: blush + cream, lavender + sage, or daffodil yellow + white.
- Cluster flowers in groups of three for a natural look, anchoring them with floral wire.
- Tuck in eucalyptus sprigs to fill gaps and add movement.
Want a little charm? Hang a tiny wood sign that says “Hello” or “Welcome.” FYI, asymmetry looks chic—load up the bottom left and keep the top right airy. It’ll look intentional, promise.
2. Summer Glow-Up: Coastal, Citrus, Or Cottagecore
Summer is your wreath’s time to shine—literally. Go bright and playful, or cool and breezy. There are options for every vibe.
Three Easy Themes
- Coastal Cool: Wrap a foam base with thick rope, then add dried starfish, shells, and a denim-blue ribbon. Keep it minimal for that beach-house look.
- Citrus Pop: Use a eucalyptus base and wire on faux lemons or oranges. Add a black-and-white gingham bow for a fresh kitchen-door moment.
- Cottagecore: Layer wildflowers (think chamomile and daisies) with soft linen ribbon. Imperfect is perfect here.
Pro tip: Seal any natural elements with clear matte spray so they don’t crumble in summer heat. Also, avoid placing on full-sun doors—your lemons don’t need a tan.
3. Fall Cozy Mode: Textures, Pumpkins, And All The Warm Tones
Fall wreaths are basically a warm hug for your entryway. Lean into texture—wheat, dried grasses, velvet pumpkins, and plaid ribbons.
Build The Layers
- Base: grapevine or straw—both have that rustic feel.
- Filler: dried wheat, pampas grass, or preserved oak leaves for volume.
- Focus: mini pumpkins (faux is best), pinecones, and a chunky velvet bow.
Try a crescent design: load the bottom and curve the pieces upward for a modern swoop. Add a few cinnamon sticks, and your porch will smell like a candle (in the best way).
4. Winter Wonder: Evergreen, Minimalist, Or Glam
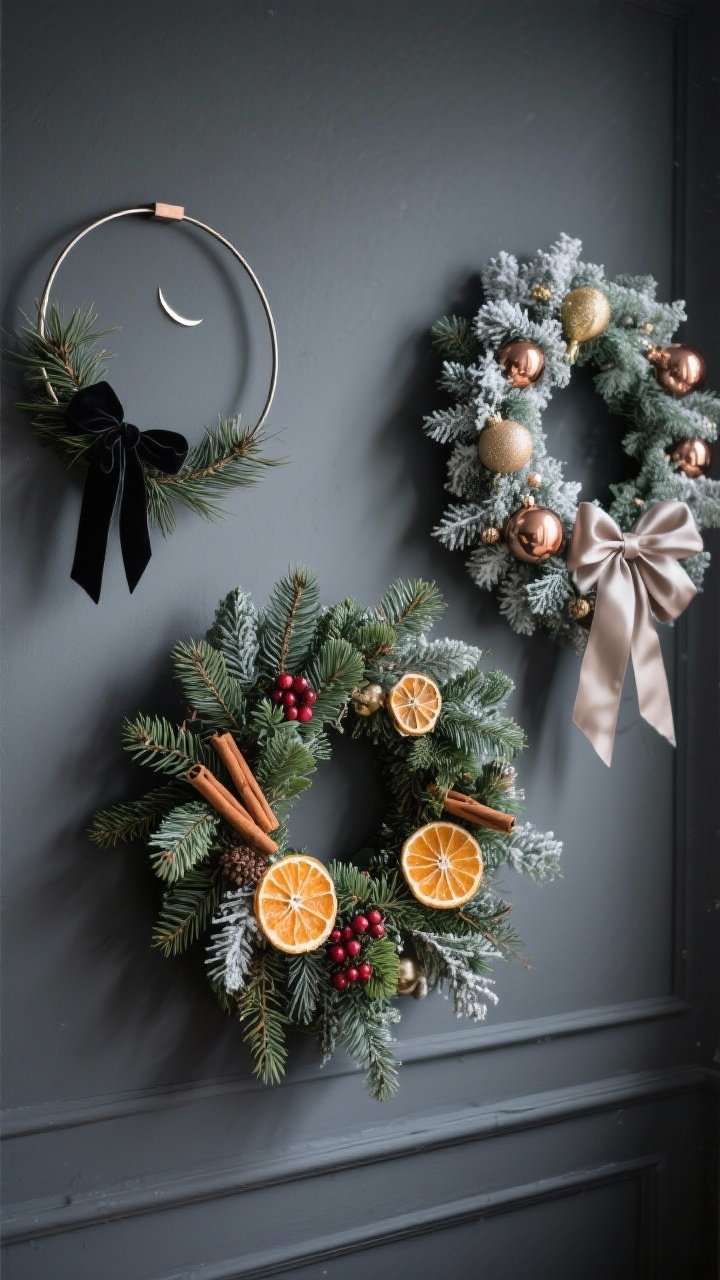
Winter wreaths don’t have to scream Santa. Go evergreen and elegant, or cozy and sparkly. Keep it classic so it lasts beyond the holidays.
Pick Your Style
- Nordic Minimal: Metal hoop + a half-moon of cedar branches, tied with black velvet ribbon. Clean, chic, and Instagram-ready.
- Traditional Evergreen: Mix faux pine, cedar, and juniper. Add dried orange slices, cinnamon, and a cranberry cluster for warmth.
- Glam Night: Flocked greenery with metallic ornaments (champagne or copper), plus a satin bow. Subtle sparkle wins.
Keep pieces wired, not hot-glued, so you can swap ornaments post-holidays and keep it winter-neutral. IMO, that’s the move if you hate redoing decor every three weeks.
5. Year-Round Neutral: The Little Black Dress Of Wreaths

Sometimes you want one wreath that works in any season. Enter the neutral greenery wreath. Classic, crisp, and endlessly versatile.
Design It Once, Refresh It Often
- Base: faux boxwood, olive, or magnolia leaves (magnolia = extra luxe).
- Add-ons: clip-on clusters for the seasons—lemons in summer, tiny pumpkins in fall, berries in winter, tulips in spring.
- Ribbon swap: linen in spring, jute in summer, plaid in fall, velvet in winter.
Mount with a clear command hook on a mirror or inside a window for a stylish interior moment. Bonus: it won’t fight with your color scheme. It just gets you.
6. Unexpected Materials: Fabric, Paper, And Upcycled Magic
Ready to have fun? Use what you have. These are low-cost, high-impact, and super customizable. Also, kids can help—if you’re brave.
Ideas To Try
- Scrap Fabric Ruffle: Tie strips of fabric (think old shirts or napkins) around a wire frame. Mix solids and patterns for that boutique look.
- Book Page Rosettes: Roll and glue paper circles, then cluster on a foam ring. Add a silk flower for a soft contrast.
- Yarn Pom-Pom Party: Make pom-poms in 2–3 sizes and pack them tight on a ring. Monochrome = chic, multicolor = playful.
- Thrifted Sweater Cozy: Wrap a foam base with sweater sleeves, then add a leather tag or wood button. Instant cabin vibes.
Keep the palette tight so it doesn’t read “craft closet explosion.” And if you’re using paper, place indoors or on a covered porch, obviously. Rain is not its friend, FYI.
7. Finishing Touches: Pro Tricks That Make It Look Store-Bought
The difference between “cute” and “wow” is in the details. These small tweaks make your wreath look expensive—even if it wasn’t.
Elevate Your Craft
- Odd Numbers Win: Group florals in 3s or 5s for balance.
- Depth Matters: Layer tall stems behind fuller pieces so it doesn’t look flat.
- Wire > Glue: Wire gives you flexibility; glue is for final, tiny touches.
- Hide The Mechanics: Tuck stems into the base and cover wire with leaves or ribbon tails.
- Scale Check: Door = 18–24 inches. Apartment or interior door = 14–18 inches.
- Bow Placement: Bottom center is classic; side placement feels modern and slightly cheeky.
- Longevity: Use UV-protected faux greens if your door gets sun. Store in a garment bag to prevent dust and crushing.
Final polish: fluff everything after hanging. Step back, squint, and adjust any awkward gaps. It’s the two-minute difference between “DIY” and “designer.”
You’ve got this. Whether you go floral for spring or glam for winter, these DIY wreaths for every season bring instant personality to your space. Keep it fun, tweak it for your style, and don’t stress perfection—charm beats precision every time. Now go make your front door the star of the neighborhood.